How to Make a Spotify Artist Account [in 6 Easy Steps]

As an artist, you want your music to be heard by as many people as possible. Therefore, being present on the most significant music streaming platform, such as Spotify, is crucial!
Spotify artist account called “Spotify for Artists” allows you to improve your profile, pitch your new songs to playlists, oversee your audience’s engagement, and more.
So in this article, I will show you how to make a Spotify artist account step-by-step, as well as give some tips on how to improve it.
Jump to sections you would like to learn more about first:
- Prerequisites for Making a Spotify Artist Account
- How to Make a Spotify Artist Account (Step-by-Step)
- 5 Tips for Optimizing Your Spotify Artist Account
- Benefits of Having a Spotify for Artists Account
- Frequently Asked Questions
Prerequisites for Making a Spotify Artist Account
Firstly, it’s essential to know that uploading your music straight to Spotify is impossible.
To do that, you must use third-party digital distributors to get your projects on Spotify’s streaming platform and many others.
Therefore, you need a subscription from either Distrokid, TuneCore, or any other distribution service.
You will also need the following:
- A ready-to-be-released song or an album
- Cover art
- Band or artist name
- The song title
Once you have these, you will be ready to create your artist profile.
How to Make a Spotify Artist Account (Step-by-Step)
To make a Spotify Artist Account, all you have to do is follow these simple steps:
1. Sign Up for Digital Distributor
By using distributors like Distrokid or TuneCure, you can upload your music to most streaming platforms at once.
This is a must-have subscription service for any independent artist, as through it, you can manage your songs across all the streaming platforms and get paid for your streams.
You can learn more about how to access Spotify for Artists using DistroKid in dedicated guide.
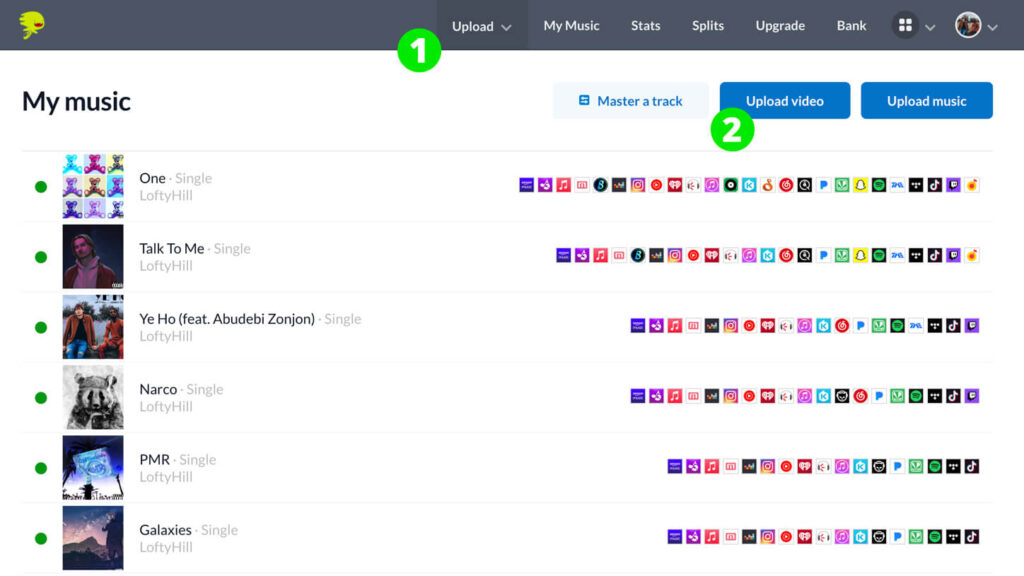
2. Upload Music
After signing up for one of the distribution services, you are now a step closer to making your music go live.
Now, when you log in to your distribution service profile:
- Click the button “Upload”
- After that, “Upload music”
NOTE
In my examples in this article, I will use the Distrokid distribution service platform.
After that “Upload music” page will appear, then:
- Locate the “Track 1” field
- Click “Choose file” to upload your song
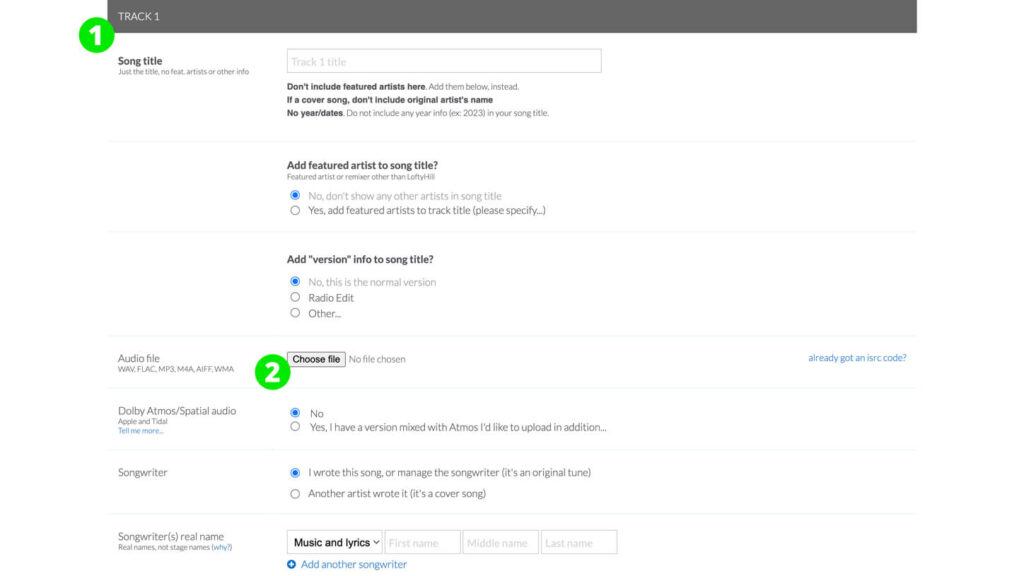
Next, just fill out all the requested details about the song and the artist information, and you are ready to release.
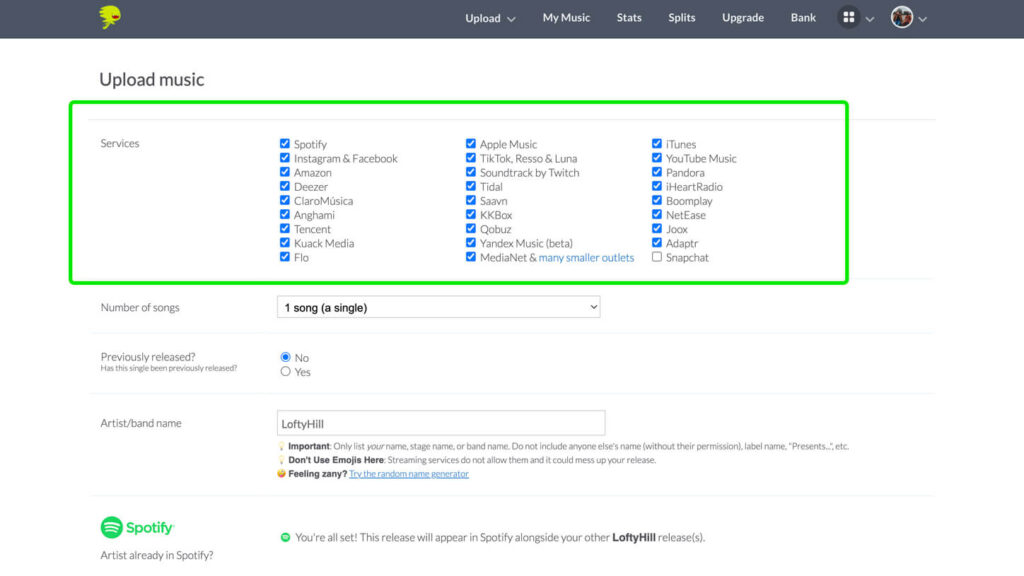
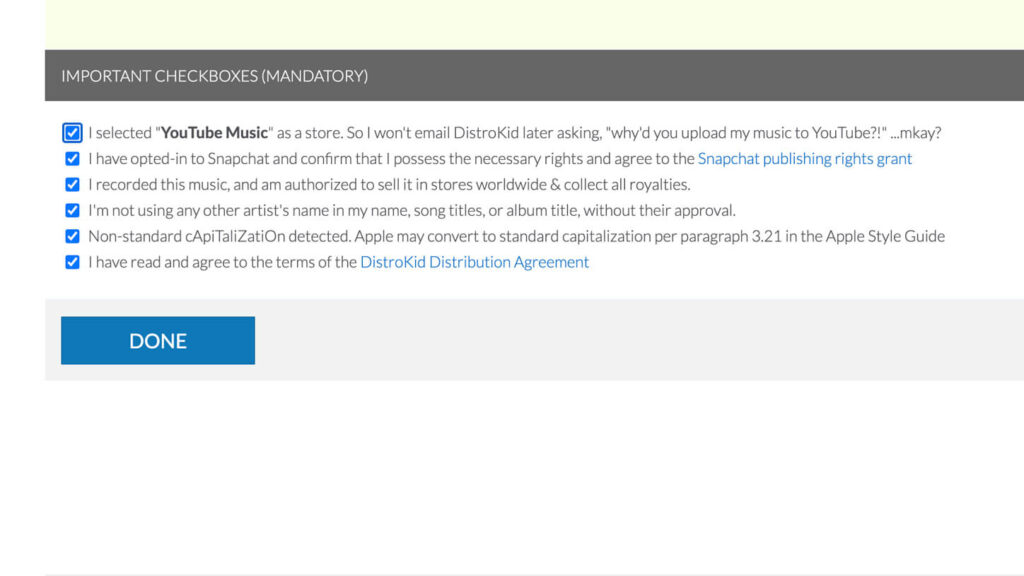
3. Submit Music to Spotify
To ensure your Music gets uploaded to Spotify, tick the right boxes in the field called “Services”.
In this part, you can choose which streaming platforms your song goes to, so be sure to check all of them or only specific ones – depending on your preference.
4. Claim Your Artist Name via Digital Distributor
After you have uploaded your audio files, filled out all the details, and chosen the specific streaming platforms – it’s time to choose your artist name.
Locate the “Artist/band name” field and write in your artist name.
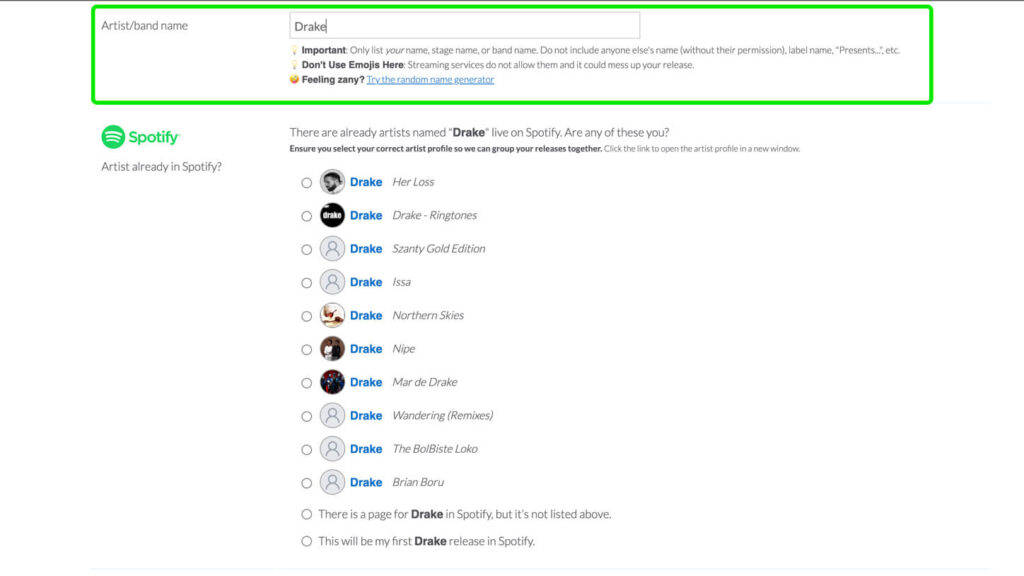
Distrokid will automatically show if there is already an artist with that name on Spotify, Itunes, Youtube music, etc. Therefore, be sure to choose a unique name.
Otherwise, you won’t be able to upload or will be rejected.
When all the required fields are completed/filled out and your files have been uploaded, simply go to the bottom of the page and click “DONE”.
Congratulations!
Your Music will release on the biggest streaming platforms in just a few days.
5. Claim Spotify Artist Profile
To claim your Spotify Artist profile, you must first have a personal Spotify account.
If you do not have it yet, you can sign up for Spotify here.
You will also need your Spotify Artist URI, which you can get here.
NOTE
You must be logged in to your disruption service platform to create your Spotify Artist URI, in my example – Distrokid.
I will show you the exact steps as described in the Distrokid Help Article example.
After you have your personal Spotify account and Spotify Artist URI ready – visit the “Get access to Spotify for Artists” page and follow the next steps.
Firstly, click the box “Artist or manager” to tell Spotify who you are.
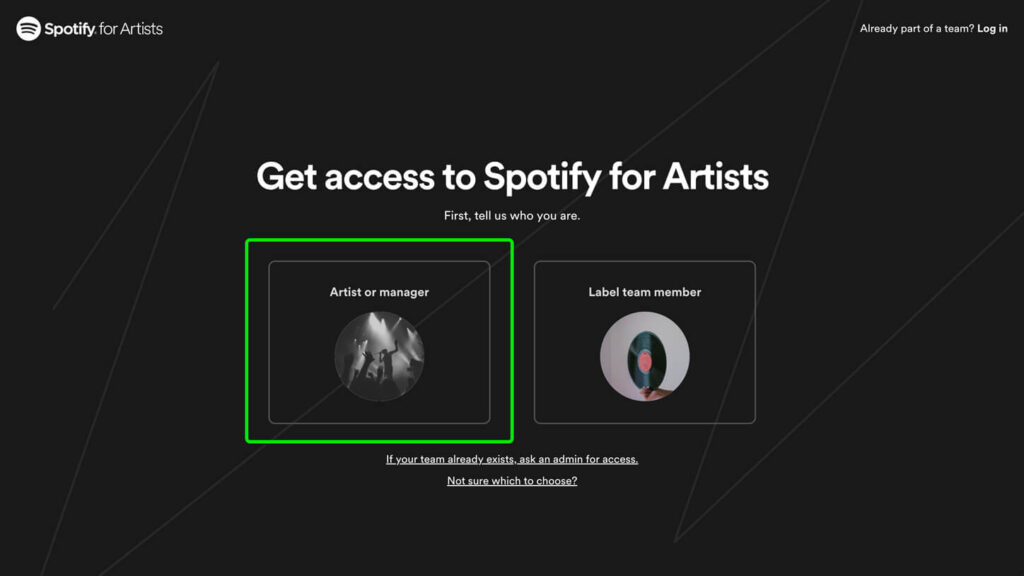
Then click “Continue”.
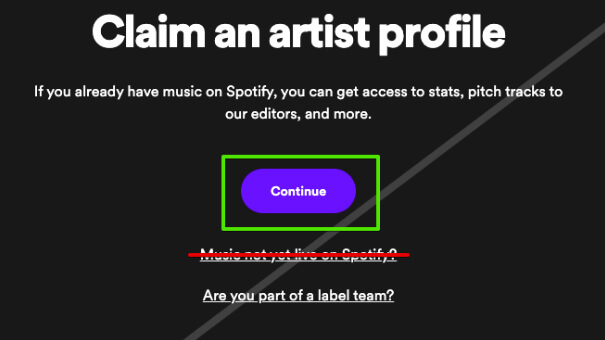
Next, confirm the personal Spotify account you wish to connect to your artist page.
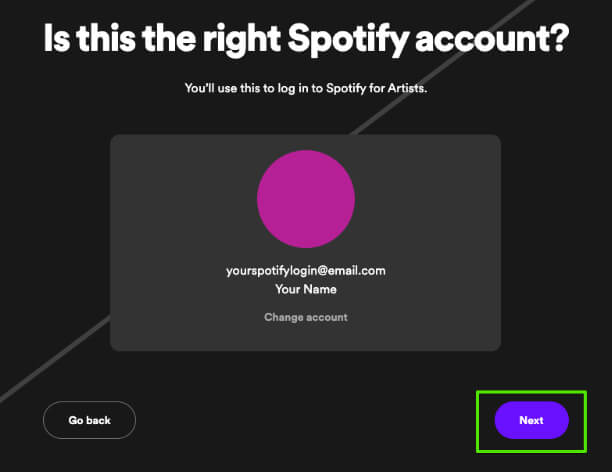
Paste/type your Spotify Artist URI.
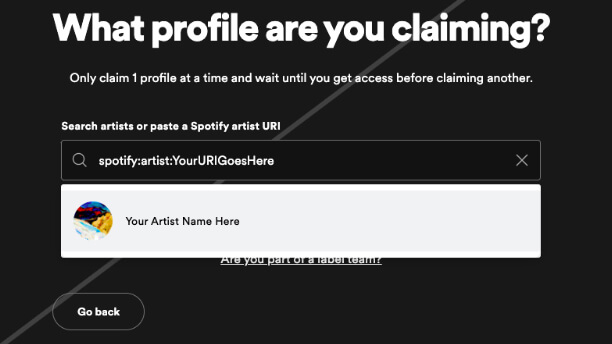
If your page is ready to be claimed, it will pop up in the list. If not, you must wait until your profile shows up on Spotify, as you will only have your information on their platform after your distributor has sent out the data.
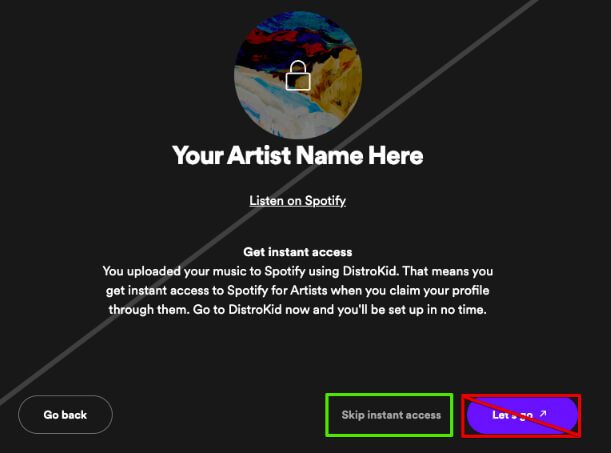
Before your release goes live, you won’t be able to use DistroKid’s Instant Access feature.
Therefore, you’ll want to click “Skip instant access” to get verified through Spotify directly.
Then enter the email address you want to use for your Spotify Artist account.

You will receive an email with a verification code.
Enter the verification code, and complete the required information on the following screen.
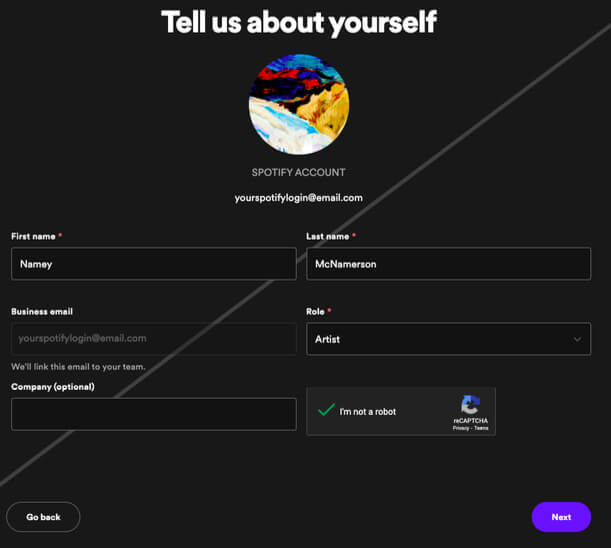
You will also be requested to connect your social media accounts or paste the link to your artist’s website.
After that, you are all set. Well, almost…
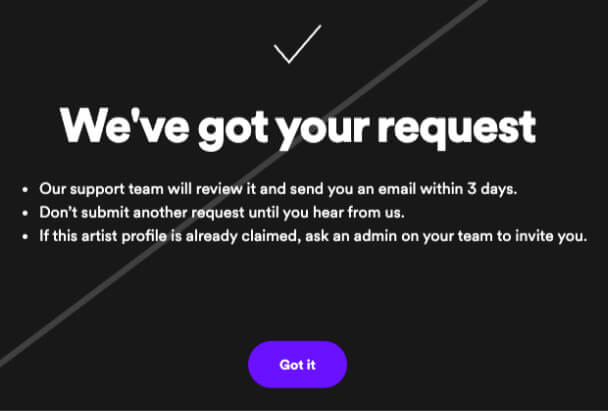
You’ll get an email from Spotify within 3 days.
They typically request the Universal Product Code (UPC) of your upload for confirmation.
You can find your UPC below your artwork on the right-hand side of your album page!
It’ll say “DK UPC: …”
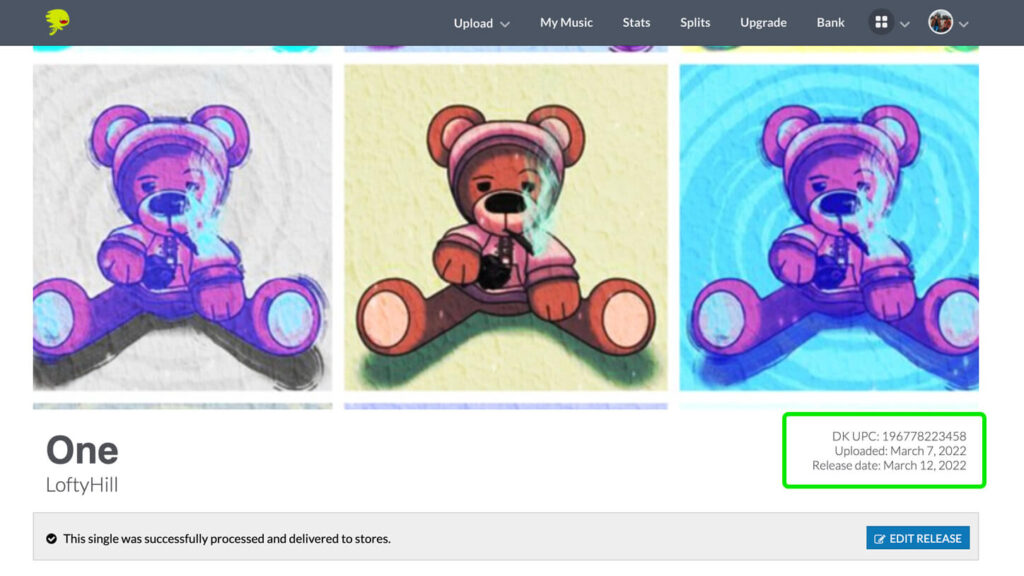
The Universal Product Code (UPC) is a unique 12-digit number assigned to each individual product sold in stores and online.
With that, you’re all set – having claimed your Spotify Artist profile!
You’ll then be able to access your Spotify Artist profile through Spotify for Artists.
6. Optimize Spotify Artist Account
Now that you have uploaded your Music to Spotify and have claimed your Spotify for Artists account, it is time to optimize your profile.
For an artist, your profile page is like a business card.
Accordingly, it needs to be improved and updated frequently to show your audience that you are worth their precious time.
5 Tips for Optimizing Your Spotify Artist Account
Here are five tips for optimizing your Spotify Artist account:
1. Use Artist Pick
Artist pick is a valuable tool, and you should use it often.
Just like “pinned tweets” on Twitter, this allows you to have your newest releases or just a favorite song to stay on the top of your profile for 2 weeks. The best part is that it can also be an audio file of the Artist with a message to their listeners.
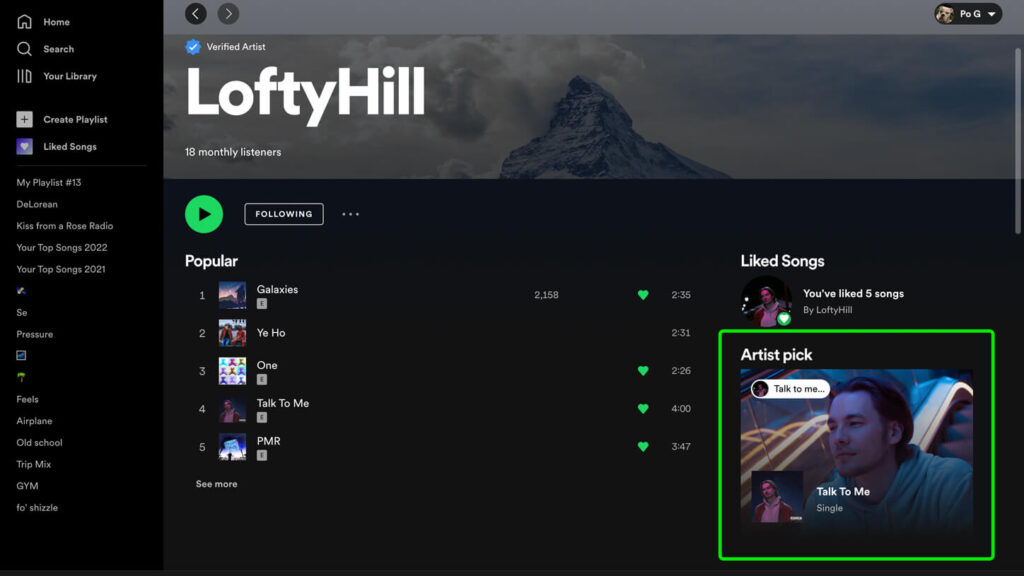
It’s a great little tool, and you should make sure to use it at all times.
2. Create a Custom Playlist
Creating a custom playlist on your Spotify Artist Profile is an excellent way to connect with your fans and other creators.
This adds a personal touch to your profile, as you allow your fans to look into your personal taste in music. This will also boost your chances of collaborating with other like-minded artists.
Therefore, keeping your artist playlists fresh and updated with other upcoming artists is essential.

3. Customize Your Profile
Keeping your profile up to date is crucial.
So, be sure to update your profile image and the background art with each new release. This is a great way to raise your brand awareness and keep your audience attached.
Make sure to only use high-quality images that reflect your personality and music.
On top of that, Spotify allows you to write an artist Bio that is 1500 characters long. You can check a full guide on how to write a captivating artist Bio on Spotify.
Make sure to take advantage of this opportunity and write a description that perfectly tells your story and fits your brand.
4. Connect Your Merchandise Store
At the end of the day, the music industry is also a business.
To have a fruitful career and long-lasting print on your fans, having your merchandise is a great way to get into the hearts of your fans.
Not only is it a walking advertisement of your brand when they buy your merch, but it will also bring in new income streams, providing you with more freedom to be the Artist you always wanted to be.
Spotify For Artists allows you to connect your store and sell your merch on Spotify – so, consider using this tool if you have a store, or plan to create it.
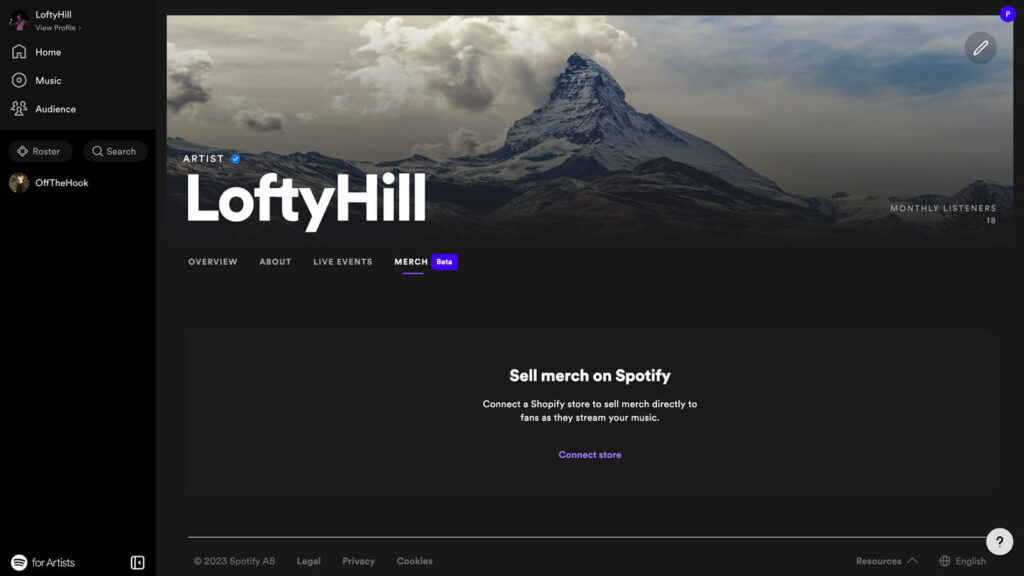
NOTE
At the time of writing this article the functionality to connect your store is still in the beta version it is subject to change.
5. Keep Your Events Up-to-Date
Last but not least, update your profile when you already know your tour dates or concert times.
As mentioned previously, Spotify For Artists is like your business card – your fans can view your profile to see where and when you will perform next.
On top of that, your fans can use your Spotify profile even to acquire tickets.
Benefits of Having a Spotify for Artists Account
As an artist, you want to know about your audience as much as possible.
It is essential to know which songs people listen to the most, in which countries you are the most liked, and so on.
Spotify For Artists offers many valuable tools to get a more detailed look into your fans and analytics of your songs.
Here are some of the main benefits that your own Spotify artist page offers:
Access In-Depth Audience Analytics
Your song is your product, and your music career is your business, which means your Spotify listeners are your customers.
As in any business, it is required to understand who you are selling to and why.
Spotify For Artists provides in-depth analytics that makes it easier for you to create your Customer Profile.
You will have excess data like:
- Demographics
- Listeners’ location
- Source of streams
- And much more
Review this data frequently to make sure that you are reaching the right people and to create a better understanding of your customer base.
Get an Overview of Your Music Analytics
It is essential to understand which of your songs are doing the best.
Is it 5 people streaming the same song 10 times per day, or its 50 people streaming it once?
There’s never too much data. With Spotify For Artists music overview, you can see how many people, when, from which country, and from which stream’s source, listened to your songs.
Pitch Your Music to Official Spotify Playlists
Spotify has 489 million monthly active listeners as of 2023.
Therefore, there are no better ways to get your music heard than being on the Official Spotify playlists.
Before every release using Spotify for Artists, you can pitch your songs to Spotify curators and have a chance to get on one of their Spotify curated playlists.
This is a significant breakthrough, as millions listen to them every month. So, be sure always to pitch your upcoming releases.
You can learn more about how to write a perfect Spotify playlist pitch email in dedicated guide.
Frequently Asked Questions
Can Anyone Have a Spotify Artist Account?
Yes and no. To have a Spotify Artist account you need to first have music released through distributors like Distrokid or others. Then you will be able to request your Spotify Artist Account.
Why Can’t I Create a Spotify Artist Account?
You may not be able to create a Spotify Artist Account if:
- You have not released music with a digital distributor and made sure it goes live on Spotify
- You have an issue with the data you are putting in the Spotify request page
- Your Music has copyright issues
How Do I Create a Spotify Artist Profile?
You can create an artist profile by subscribing to one of the digital distributors and releasing music on all major streaming platforms such as Spotify. You will be requested to fill out data about yourself, your artist brand, and the projects you want to go live.
After you have done these steps, you will be able to get an artist profile on Spotify and on any of the other streaming platforms.
Does It Cost to Create a Spotify Artist Account?
It does not cost to create a Spotify Artist account. Still, you must pay to get your Music released with digital distributors to be able to request access to your artist account.
Their pricing is $14.99/year (TuneCore) and $19.99/year (Distrokid).
You can learn more about how much it costs to put songs on Spotify in our full guide.
Can I Make a Spotify Artist Account Before Releasing Music?
You cannot make a Spotify artist account before releasing your new music.
Spotify works with digital distributors, therefore, if you have yet to release projects via those distributors, there will be no partnership with Spotify for you available.
Is a Spotify Artist Account Free?
Yes, the Spotify for Artists account is free. After you have released music via digital distributors, all you have to do is visit the Spotify for Artists “get access” page and request your access.
How Does Spotify Verify You as an Artist?
Spotify verifies you as an artist by you simply filling out a page on their website. You must fill out the required information and wait for their official reply.
To learn more about this, you can read their blog article on how to get verified.
How Long Does Spotify Take to Verify if You Are an Artist?
There is no set time for how long it takes for Spotify to verify you as an artist. That being said, typically, you will receive a reply from them within 3 to 4 weeks.
To speed up this process, you can use any of Spotify’s Preferred Artist Distributors, such as:
- DistroKid.
- CD Baby.
- EmuBands.
- Record Union.
- Vydia.
By doing this, you will get instant access to Spotify for Artists. Your verification will only take up to 1 week.
Final Thoughts
These days to become a successful artist, you will need all the help you can get.
Spotify is doing a great job of providing upcoming artists a chance to analyze their releases and a detailed look into their audience.
As we all know, social media and streaming platforms are the most extensive drives for gaining new listeners and fans worldwide, with the least resources.
Spotify for Artists is a must-have tool to achieve your desired music goal.